Wednesday, December 29, 2010

Caramel Pecan Brownies

Since I've been taking requests for treats lately, a friend requested caramel brownies.

I delivered.

And these are spectacular. I took the recipe from Bake at 350.

These aren't entirely homemade. But no one needs to know.

Mix together a box of german chocolate cake mix, 1/3 cup evaporated milk, and 3/4 cup melted butter.

Spread half of the mixture onto the bottom of a 9x13 pan. Bake for 6-8 minutes in a 350 degree oven. While it's baking, prepare the caramel mixture. I'll get to that in a second.

Sprinkle 1 cup of chocolate chips and 1/2 cup of chopped pecans over it.


Bliss. Pure bliss.


Unwrap a 14-oz package of caramels (this is crazy time-consuming....maybe enlist some help) and combine it over low heat with 1/3 cup evaporated milk.


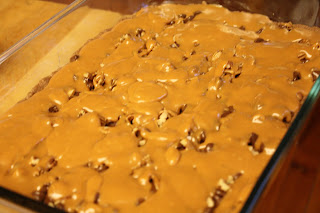
Pour directly over the love happening in the pan.
Mercy.


Top with the rest of the brownie batter. It looks weird, but it's good to have little rivers of caramel flowing through the brownie.


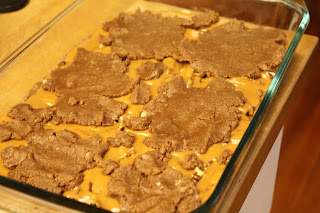
Bake for another 15-20 minutes - the caramel will be bubbling, but you don't want it to burn.


It doesn't look nearly as weird when it's cut up. Wowza.


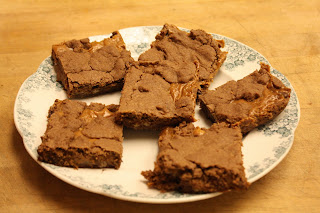
The layer of chocolate chips and pecans kick it up from delicious to ridiculous.
These brownies are ridiculous.
And totally worth it.

Monday, December 20, 2010

Peppermint Cheesecake

I've started taking requests.

I needed to break out of the things I usually make, so before a Christmas party I hosted, I asked some people what dessert they wanted.

Cheesecake it was.

I've only eaten cheesecake a couple times....I'm not a big fan, so making this was an adventure.

Start with some chocolate wafer cookies.


Grind these up into tiny crumbs and combine them with melted butter and sugar. Press them down and along the sides of a springform pan.

Do you see how close my laptop was to the pan? Probably not a good idea.


Mix up cream cheese, half and half, vanilla extract, peppermint extract, eggs until smooth and gorgeous. Stir in some crushed up peppermint candies (I used candy canes).


Pour the mixture over the crust in the springform pan and pop the pink cheesecake into the oven for about an hour and a half. This, by the way, is 45 minutes longer than the original recipe called for. Yikes.
When I pulled it out, it wasn't completely set, but I was tired of waiting on it, so I just hoped that it was good enough!


After spending the night in the fridge, it was perfectly set and ready for taste testing.


Delicious! This is a really great and easy cheesecake recipe that could really be tweaked and changed!


Peppermint Cheesecake
(serves 10)
Crust
1 9-ounce box chocolate wafer cookies
1/4 cup sugar
1/2 cup (1 stick) unsalted butter, melted
Filling
2 lbs. cream cheese, room temperature
1 cup sugar
4 large eggs
1/4 cup half and half
1 tsp vanilla extract
1 tsp peppermint extract
1/3 cup crushed peppermint candies
For the crust:
Wrap the outside of a springform pan with aluminum foil. Finely grind the cookies with sugar in a food processor. Add butter and press mixture onto bottom and up the sides of the pan. Refrigerate while preparing filling.
For the filling:
Preheat oven to 350 degrees. Beat cream cheese in large bowl until smooth. It is really important to start with room temperature cream cheese! Add sugar and beat until well blended. Add eggs 1 at a time, beating until blended after each addition. Beat in half and half, and then the extracts. Stir in candies and pour into pan.
Bake until filling is mostly set and the edges are puffed - this will probably take between an hour and an hour and a half.
Refrigerate overnight.


Saturday, December 11, 2010

Decorated Christmas Cookies

As I mentioned in my post yesterday, I was inspired to bake some cookies. Not just any cookies.


Beautiful cookies. Decorated with royal icing. These are legit.

And the icing only require 4 ingredients (I added lemon extract, as well): powdered sugar, corn syrup, meringue powder, and water. I followed this recipe.


After sifting the powdered sugar....


You mix everything in a stand mixer (which I can do now!!). I forgot to take pictures of that. Whoops.
And I really thought I'd taken pictures of tinting the icing red and green and filling the piping bags. But I didn't! Oh well.
Moving on...outline your cookies with the royal icing (I used a #3 tip) and let that sit for at least 10 minutes so it could harden and create a space that I could fill with flood icing.
Create the flood icing by mixing water with the royal icing. I used another piping bag and filled it in with icing. I used a skewer to get it into the corners because I didn't have any toothpicks. I adore these snowflakes.


I did the same thing with these little trees.


The corn syrup in the icing makes them shiny!


Once the icing had mostly set up, I did something very sneaky.
I mixed together water and meringue powder to make a kind of glue, and I used a pastry brush to apply it to certain parts of the cookie. I put sprinkles all over it, and after I shook off the excess, which you can see at the end of the post. (Somehow my pictures got out of order!)


I did the same thing with the snowflakes - I love how they turned out!


I made dots on the ornaments, which I liked, but I'm not very good at outlining circles yet.


This one's just for you, Candice!! :-)


I found a girl cookie cutter, so I designed a few different outfits.


Here's the outcome of the "glue" on the tree cookies. :-)


This was my first time using piping bags and royal icing....you should try it!

Friday, December 10, 2010

My Green Machine :-)

My beautiful shiny new green KitchenAid mixer came in the mail on Monday. But this was finals week!! So I had to wait until tonight to use it...and it was delightful.


I recently ran across this blog: Bake at 350. This woman makes some killer decorated sugar cookies, and I needed in on that. So I borrowed her recipe and ran with it!

She starts by creaming cold salted butter and sugar.

Notice that I used my new mixer.

I kind of love it.


Since the butter's cold, it'll take a little longer than usual.
Add in an egg and vanilla extract. She also suggested almond extract; I had lemon extract on hand, so I used that. It was a great choice!


Pour in flour and baking powder, and mix to combine.


This dough is kind of funny, because it ends up crumbly, and you're left saying, "How did I mess up a sugar cookie recipe? Really??".


But it's supposed to be like this! You just need to knead it with your hands to get it to a good cookie dough consistency.


I took about half the dough and put it on a piece of parchment paper. There's no need to chill the dough before rolling it out because we started with cold butter, remember?


Dust everything in sight with flour, and roll it out to your desired consistency.


FYI - that is too thin. But it happened.
As my students say, "It's like, whatever."
As I say, "I'm over it."

I got cookie cutters at Sur La Table last night. I had never been to that remarkable place... I love it!

I cut these out and put them on another piece of parchment and stuck them in the freezer for 5 minutes before baking them - that is the key to keeping crisp edges! And it worked!
Repeat with the remaining dough, making sure to reuse all the scraps. At the end, when I didn't have quite enough left for another cookie, I just grabbed the extra pieces and baked them as a snack. :-)

Before they were baked....

And after! They are delightful and popped right off the cookie sheets (because they're full of butter!).


These were my favorites - look at these adorable snowflakes!!


And I made lots of little trees and ornaments and people.


Tomorrow is my first experiment with royal icing (because these are WAY too cute to leave alone!!).
Here's the recipe for the cookies (adapted from Bake at 350):
3 c flour
2 tsp baking powder
1 c sugar
2 sticks salted butter, cold
1 egg
3/4 tsp lemon extract
1/4 tsp vanilla extract
Bake for 10-12 minutes at 350 degrees.