Friday, July 30, 2010

Bread and Butter!

I have a confession.

I am a wanna be.

I want to be an excellent baker. So I only post my successes on here! Trust me - for every blog post I am willing to share, there are at least as many mishaps. Perhaps one day I will tell you the tragic tale of the caramel corn.

But today I want to teach you how to make bread. I've tried to make bread before, to no avail. But this is so easy, even I could do it! It's yet another of my favorite recipes from Joy the Baker.

You start with 3 3/4 cups of bread flour (I used King Arthur's, of course!), 2 tsp of dry active yeast, 2 tsp salt, and 1 1/2 cups warm water. Toss it all into a mixer and beat with the paddle until it all comes together.

Switch to the dough hook, mix for two more minutes, and let it rest for 5 minutes. Then mix it again for 3 minutes. I don't know why; I just followed the instructions. And good things happened.


Take it out and knead it, using additional flour. It should be smooth and gorgeous...like this! Put it in an oiled bowl, and turn it so that all sides of the dough are lightly coated. Cover it with plastic wrap and a towel, and let it rise for an hour and a half. Punch it down, and let it rise for another half hour.


Prepare a floured surface....


And dump the beautifully risen dough onto the counter!


Separate the dough into two halves, and form them into rounds. Cover them with a damp towel and allow to rise for 45 minutes to an hour.

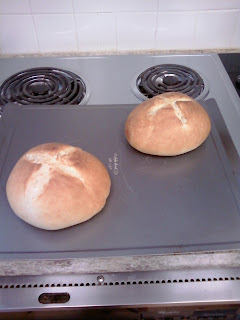
Preheat the oven to 450 degrees, and during the last 20 minutes of rising, put a baking sheet upside down in the oven. Put the dough onto the sheet and score them to allow them to expand. I use a razor blade - it is way sharper than knives and doesn't drag the dough as much.


Right after popping these in the oven, I tossed 1/4 cup of water onto the oven floor to create steam. I repeated this a couple minutes later.
After baking for 20-25 minutes, these little guys will be ready for you!


While the bread was baking, I took the opportunity to whip up some butter (again, Joy the Baker inspired me). I took 2 cups of heavy whipping cream and beat them with the wisk attachment until the butter had separated from the buttermilk. I strained it and rinsed the butter under cold water and then added some sage from my garden. So easy!
This is the tasty result:


Thursday, July 29, 2010

Paige vs. the Cabinet

I built a cabinet last week.

Never mind the fact that it came in a box from Target and had predrilled holes.

Never mind the fact that it took me 2 hours, although the box said it could be done in "minutes."

Never mind the fact that, after spreading everything out and looking at this mess, I said to Natalie, "This is a job for a man."


I quickly came to my senses. I have a hammer! I have a screwdriver! I can do it!

So I read the directions....


And I began.

Eventually it started looking like a cabinet.


Two hours later, I had this beautiful cabinet with swinging doors to house all my baking supplies! It's perfect.


Next up: bread and butter. Get excited.

Monday, July 19, 2010

Homemade Cheez-Its

Why should you spend your evening making these delectable treats instead of just running out to the grocery store?

Because you can. And you should. And they are 10 times better and healthier (don't read the ingredients too carefully....). Oh, and they have red pepper flakes in them, so they've got a kick. Delicious.

You start by grating a lot of cheese. Get your muscles ready.


Mix the cheese with flour, red pepper flakes, salt, and butter (the amounts are at the end of this post). I used a pastry cutter; the original recipe suggested a food processor (I definitely don't have that luxury).

It should look like this when you're done.


Add the milk....

And it will come together in a beautifully cheesy ball of dough.


Roll it out with a rolling pin (or your hands, or a glass, if you don't have a rolling pin....) until it's about 1/4 - 1/2 inch thick.


Trim the edges. I saved them and rolled them back out later.
I cut the dough into strips, because the original recipe is for cheese straws, and I wanted a mix of straws and squares.


I transferred these to a baking sheet and stuck them in the oven.


Then I rolled out the edges from the first batch (I tried to make these even thinner than the straws) and cut those into little 1-inch squares. I poked the tops with a fork so they wouldn't expand too much.


Cute!

These really taste similar to a cheez-it, but they are so much better. They bake up to be slightly puffy and flaky. You need to make these, ASAP.


Homemade Cheez-Its

1 1/2 cups grated sharp cheddar cheese

4 tablespoons unsalted butter, cut into 4 pieces

3/4 cup flour

1/2 teaspoon salt

1/2 teaspoon crushed red pepper flakes

1 tablespoon milk

Bake at 350 degrees for 12-15 minutes.

Sunday, July 18, 2010

One display of God's magnificent glory in our backyard

Last Wednesday, we had an incredible storm blow through Nebraska...


"Can anyone understand the spreading of the clouds,

the thunderings of his pavilion?

Behold, he scatters his lightning about him

and covers the roots of the sea.

For by these he judges peoples;

he gives food in abundance.

He covers his hands with the lightning

and commands it to strike the mark.

Its crashing declares his presence;

the cattle also declare that he rises."

-Job 36:29-33


The heavens declare the Glory of God and the firmament shows HIS handiwork
~the sky truly turned golden on Thursday night after the storm died down a bit


It cast a tremendous and mystical light on everything...
For his invisible attributes, namely, his eternal power and divine nature, have been clearly perceived, ever since the creation of the world, in the things that have been made.

The Lord is God,

and he has made his light to shine upon us.

I love how the raindrops on our windows could turn everything into an impressionist painting...
"Has the rain a father or who has begotten the drops of dew?"-Job 38:28

And God said,“This is the sign of the covenant that I make between me and you and every living creature that is with you, for all future generations: I have set my bow in the cloud, and it shall be a sign of the covenant between me and the earth. When I bring clouds over the earth and the bow is seen in the clouds, I will remember my covenant that is between me and you and every living creature of all flesh. And the waters shall never again become a flood to destroy all flesh.When the bow is in the clouds, I will see it and remember the everlasting covenant between God and every living creature of all flesh that is on the earth.”-Genesis 8


Mightier than the thunders of many waters,

mightier than the waves of the sea,

the Lord on high is mighty! -Psalm 93:4

Monday, July 12, 2010

Pillow Cookies!

I know what you're thinking.

What on earth is a pillow cookie?

Well, first of all, it's a dream come true. It's also life changing, and maybe even a bit overwhelming.

It's a brownie inside a chocolate chip cookie.

Yup.

Don't try to make sense of this. Just accept it, bake it, and eat it. As soon as possible.

Bakerella (the inventor of cake bites) posted this recipe on her blog two weeks ago, and I dreamed about it until Saturday night, when a movie night provided the perfect opportunity to bake!

You start with a box of brownie mix. I love brownie batter, by the way. I try to do all my brownie baking alone, so I don't have to share.


Bake the brownies, and let them cool.

Then you make the cookie dough; I followed the recipe on Bakerella's blog, although I'm sure you could substitute your favorite cookie recipe (or just buy premade dough at the store!).

Then you drop it by 1/2 cup-fuls onto parchment paper. Yes, you heard me right. Then you cut a one-inch piece of brownie and smoosh it on top of the cookie dough.

My lovely assistant, Erin, did the scooping. She is an excellent scooper. Also, she is super cute. Wouldn't you agree?


Again, just to make sure you get this, we used a FULL half cup of cookie dough for each cookie. Really, you could probably use less, but you've got to get enough to wrap around the brownie.


Once you've smooshed the brownie into the cookie dough, work the dough completely around the brownie and form them into little dough balls. They are so big that only 6 fit on the cookie sheet. And they still baked into each other. Yowza.

While these were baking (at 350 degrees, for 16 minutes), I decided I needed to pray. Gluttony is a sin, and I was about to ask all of my friends to eat these! Lord have mercy.
That is a big cookie.
Confession: That was not the biggest cookie.

But look at the inside of that thing! Ohhhh.....incredible. Notice the glass of milk in the background. That's a must with this recipe.


Next up: red pepper chicken curry, naan, and mango ice cream!

Monday, July 5, 2010

Feeling Patriotic

The flag cake arrived in one piece to the party, and when it was finally time to cut it, I was nervous.

Do I look nervous? I was.

I carefully cut the first piece, hoping I had assembled it correctly....

Shazam! Flag cake!

It looks more like a flag from the other side. :-) Here's a peek at the inside of the cake.

Happy Independence Day!

Sunday, July 4, 2010

Paige vs. The Flag Cake

Last week I was browsing blogs (as I often do), and I ran across this post by 17 and Baking. A flag cake! I thought, "I'm going to a 4th of July party; this will be perfect!

Little did I know it would become a monster that would consume my Saturday morning!

I gathered all of the ingredients, Mama Martina's mixer (thanks again!), and my dear friend Rachel Hoppe.

We made three 9" round cakes --> one red, one blue, and one we left white. (I found the recipe here).

The blue looked like a bomb pop on the red spatula!


Aren't these colors gorgeous?!

We thought so.


Once the cakes were baked and cooled, it was time for me to assemble them. This was the scary part. I bought a cake leveler at Hobby Lobby for $3, and it worked really well. I sliced both the red and white cakes in half.


So I ended up with two red layers, two white layers, and a full blue layer. I set one of the reds and one of the whites aside; these will be the bottom of the flag (they are on the rack in the back of the photo).
The other red and white, and the blue layers I stacked together....


And grabbed Vanessa's favorite mug, which happened to be the perfect size for my needs. I put it in the middle of the cakes, and cut around it, through all the layers.


I ended up with this: a red, white, and blue ring, and then a red, white and blue circle in the middle. You can discard (a.k.a. eat) the red and white rings, and the blue circle. They won't be in this cake.

It would be good to have a cake plate on which to assemble this. If you don't have a cake plate, then find the prettiest plate in your cabinet. Mine happened to be from the set I found in my scary basement!


Remember the red and white layers that I didn't cut? Place the white layer down on the plate and frost it.


And then the uncut red layer.


And then frost the red layer. Lay the blue ring on top.


Frost the inside of the blue layer, and lay the white circle in the middle. Frost that....

And lay the red circle on top. You're done!


I frosted the whole thing...it looked very unassuming when I brought it to the party!

Vanessa took pictures of the final result....I'll post those tomorrow!